How We Built Our Vietnam Memorial Wall Float
Each year our church enters a float in our local town’s annual July 4th celebration parade. For several years, we wanted to take the well known the Lee Teter painting, “Reflections”, and bring it to life. However, we shied away from it afraid it wouldn’t be the right fit for a Independence Day parade.

First Vietnam Memorial Float Iteration · Montgomery County, NY
After a New York pastor and friend of ours, Jeff Vinci, did a version (pictured above) for his local Memorial Day parade, we decided it was time for us to go for it. Building off of what he had already done, we took his plexiglass panels and started to construct our own version of “Reflections: A Tribute to Vietnam”.
Here’s how we did it.
Our main goal for our floats to make a lasting impression on our audience. We take inspiring historical images and attempt to recreate the moment—live. A successful float has the players frozen in time and leaves a surreal but lasting impression with the viewer. Because a float is only viewed for a short moment, we try to design our installments with focus on one concept for maximum impact. Trying to communicate several messages or themes is not effective nor memorable.

1. Start with a Hay Wagon
We prefer hay wagons for a few reasons:
- The platform height allows for better viewing
- The wood deck is easy to built upon (screws and lags can go anywhere).
- They are mobile and easily movable.
- Multiple wagons can easily be hooked together to extend the float scene
For this float, we extended each side of the wagon by 12 inches to make our float surface area 10 feet wide. We did this to better accommodate the memorial wall section without it being extremely slanted. The three memorial wall panels are a total of 10 feet wide across (each panel is 40 inches wide, just as they are in real life).
Specs
- Haywagon: 8’ x 16’
- Hay Wagon Extended: 10’ x 16'
- Memorial Wall Panels: 8 feet x 40 inches wide

2. Finish sides with plywood
- Screw 2 feet tall pieces of plywood around the exterior.
- Use blocks of wood at the corners to keep all the joints square.
- Front plywood needs to be notches to accommodate the movement of the wagon tongue.
This plywood is decked with metallic floral sheeting, float theme, and organizational signage. The top deck edge is lined with black painted 2x3s. Holes are drilled every 8 inches to hold miniature American flags to create decorative outline around the deck. Each corner has a 3x6 foot pleated patriotic fan fastened by screws.

3. Build a background wall on the main deck.
Photo Note: Ignore the frame you see on the side between the background wall and the front panel frame. That was a failed first attempt that we ended up ripping out to create an open look behind.
We build a large wall (apart from the Vietnam Memorial Wall) for three reasons.
- To hide our supplies that we hand out during the parade.
- To provide a structural support to fasten props and other elements.
- To provide a decorative background for the float theme.
We normally build the wall 4 feet deep and 8 feet across the front (this float was 10 feet across). We made ours 10 feet and 1 inch high. Fun fact: We picked this height after traveling the parade route in our town looking for the lowest wires and tree branches we could be in danger of clipping. After measuring several places, we felt semi-comfortable that this was the highest we could make it (had to get that extra inch in there:)!

4a. Wrap the background wall in luan and paint
The very gifted Heather Gibson donates her talents to make our floats really come alive!

4b. Build Frame for Vietnam Memorial Wall Section
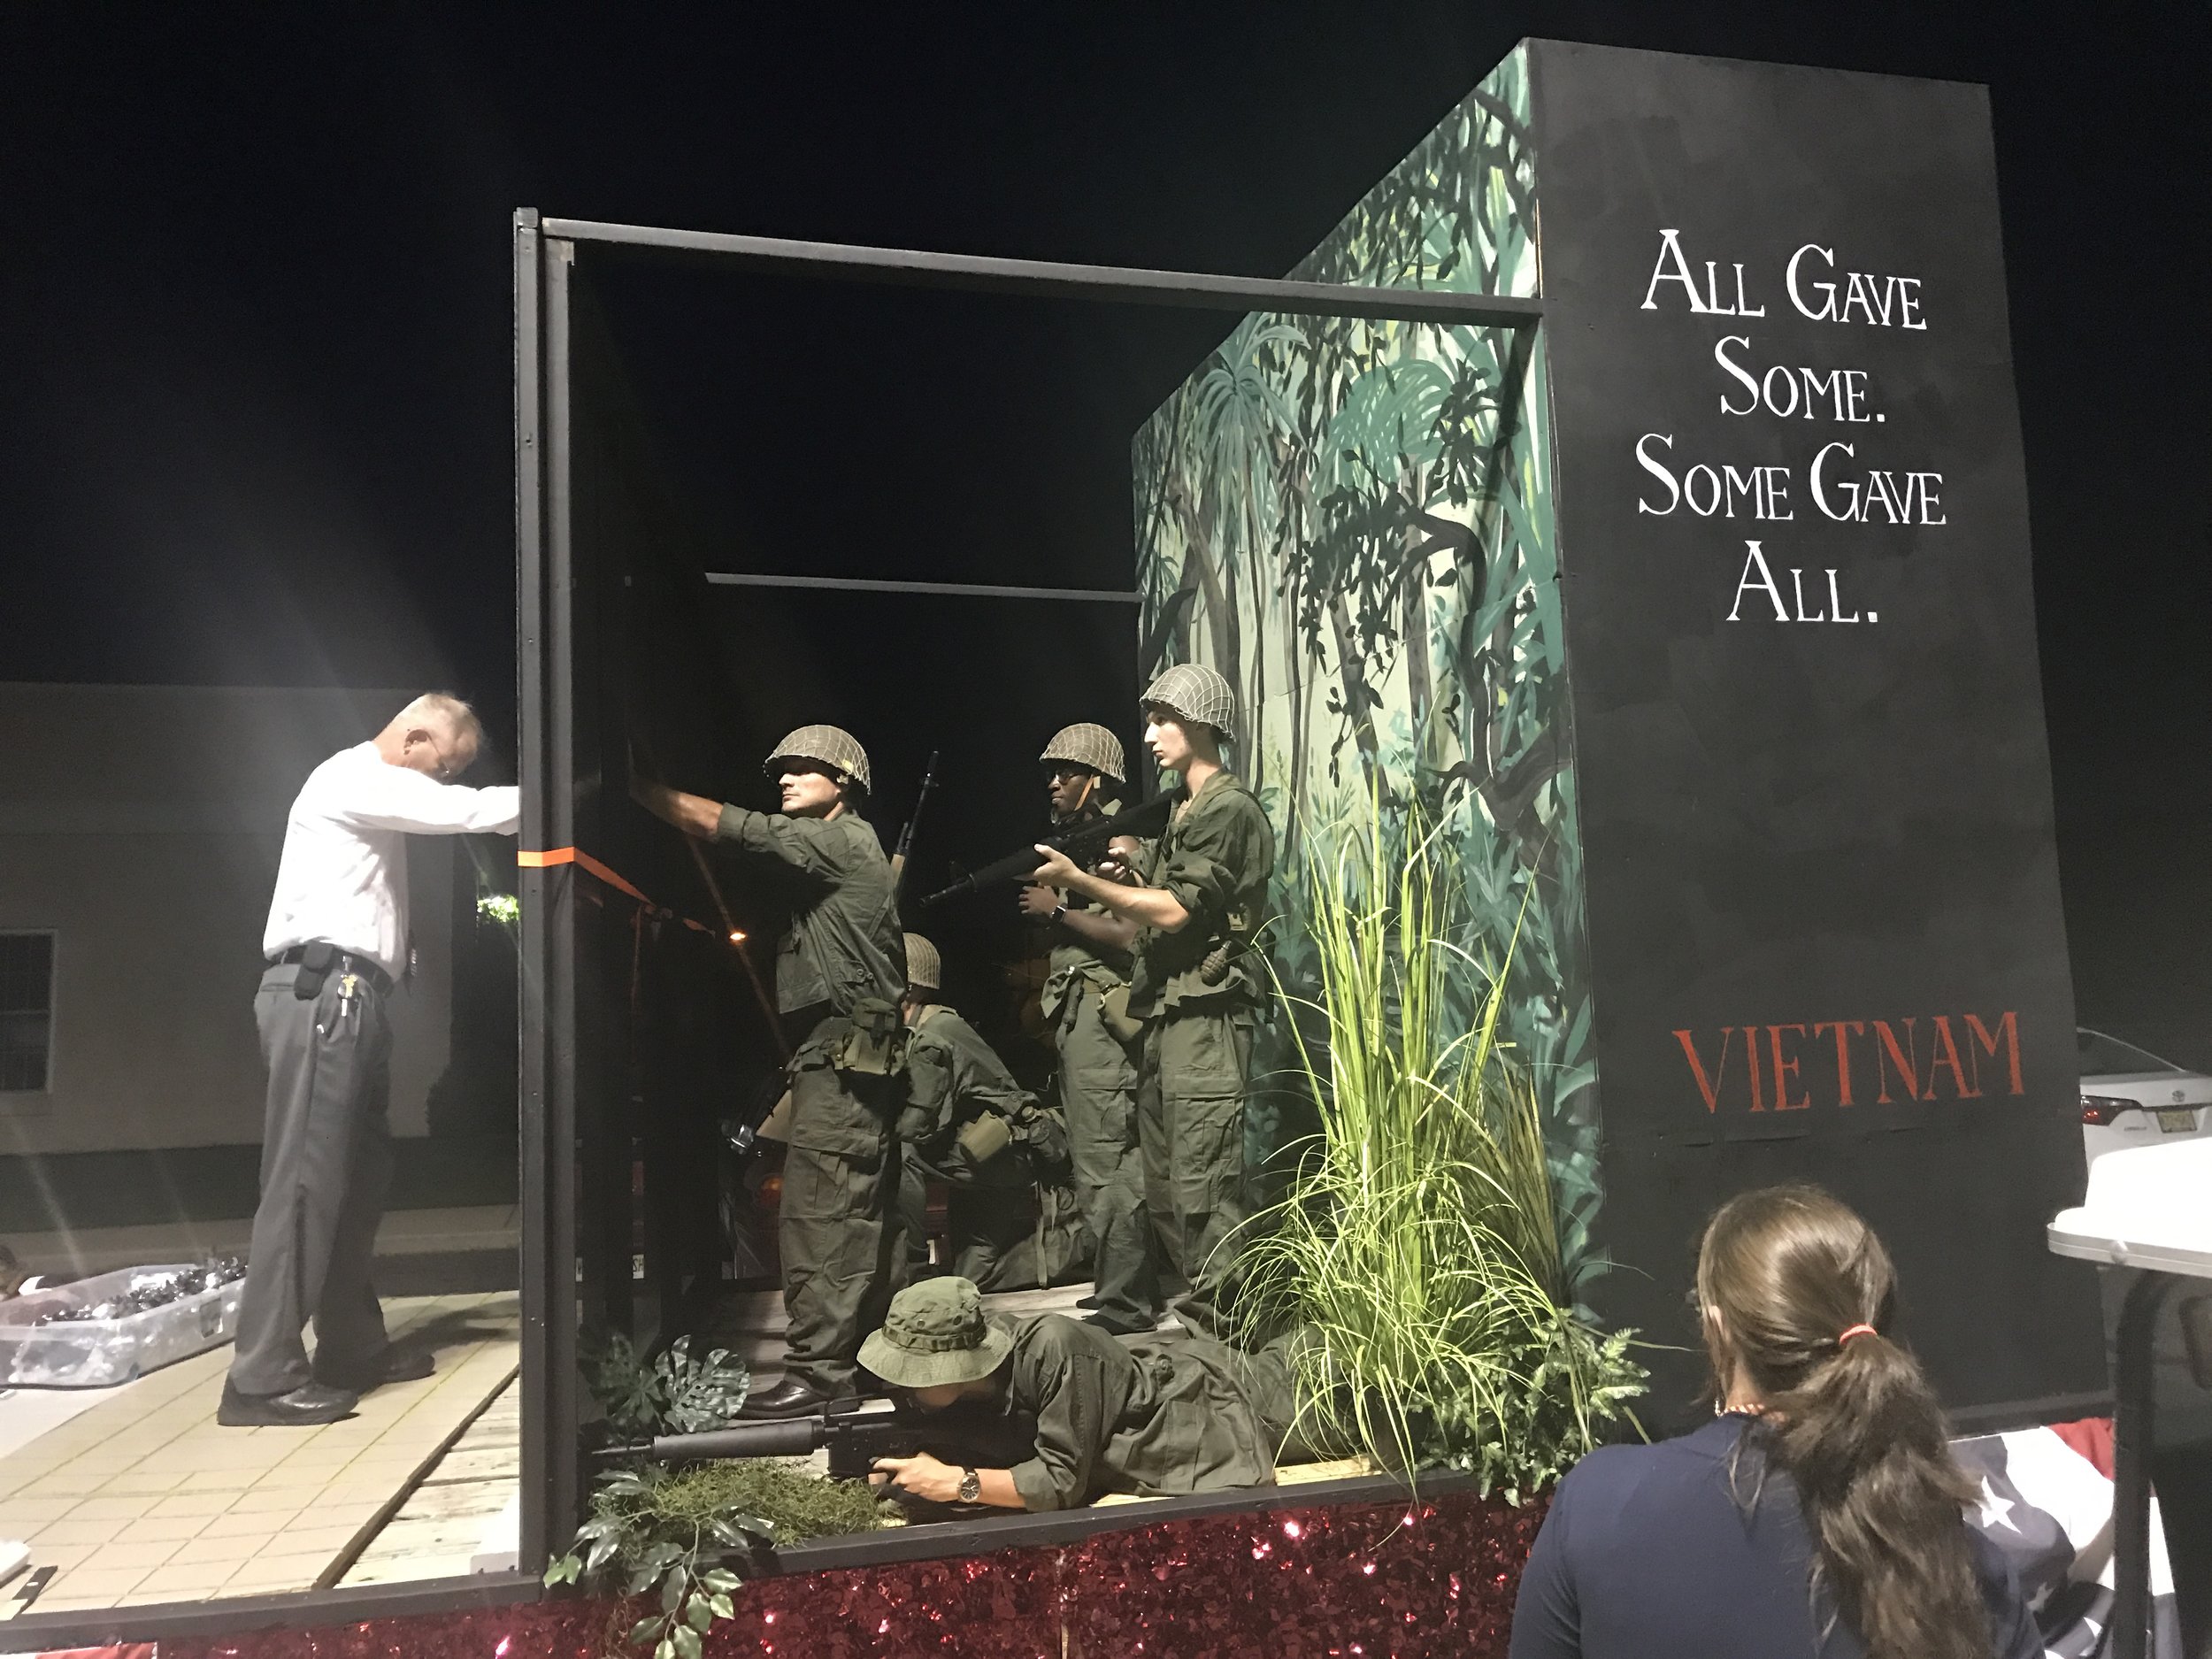
When building the frame for the Vietnam Memorial Wall section, we were worried about the top piece flexing during movement and potentially cracking the plexiglass panels. Our solution was to create a mini beam by sandwiching a piece of steel angle (2”x2” by 1/8” thick by 10’ long) between two 10’ 2x4s. Each vertical support has two 2x4s at right angles to each other to create rigid support. The top of the frame is attached by to the background wall. Each corner is additionally secured by a small brace. A 10’ long 2x4 runs along the frame’s bottom to secure the plexiglass to the frame.

5. Vietnam Memorial Wall Section
The true to life section was created from 4’ by 8’ by 1/4” thick sheets of tinted plexiglass cut down down from 48” wide to 40” wide.
Float Fact: This size matches the granite panels dimensions of the actual memorial.
To place the names on the wall, a large transparent decal was printed with white letters and adhered to the plexiglass. This decal was not an exact section replica but rather actual names of soldiers from New York. One way we’d suggest improving this design is to place the names directly on the plexiglass instead of adhering a sheet with printed names. The decal as was done seriously limited the sightline through the plexiglass.

Cross Section
The panels were carefully screwed top and bottom (pre-drill the plexiglass). Aluminum dividers for a 1/4” material were used at the two joints to keep the panels flat relative to each other (see cross section image). We added vertical 2 by 3s painted black behind each joint and used sticky velcro to hold the panels in place (we worried about wind force pushing them in and out). The Memorial Wall was placed at an angle to allow viewers to see “into” the reflected jungle. The near side was approximately 5.5 feet from the background wall, while the far side was approximately 7 feet away from the background wall.

6. Creating the Sidewalk
In front of the Memorial Wall, we painted gray a 2x4 for the memorial’s base and then left a gap which was filled with a few patches of sod for grass. The sidewalks were made from plywood. We used a router to make the groves and followed by a coating of paint. In practice, we recommend building as realistic as possible. Painting usually helps to really make the detail really come alive.

7. Finishing Decor
To create a textured and varied terrain of the jungle, we start with chicken wire bent to simulate contours of terrain and cover it with a painted textured canvas to finish the terrain effect. We added as much greenery as we could get our hands on to create the jungle look.
Float Fact: A local Vietnam veteran donated bamboo from his yard to add authenticity to our jungle design
Lettering is either hand painted or we use printed vinyl letters depending on the setting. You can see the sod laid in front of the wall and various items in the grass representing the items left at the memorial by loved ones. The float’s bottom is covered with red metallic floral sheeting (we like metallic because it really pops in the sun), outlined with blue metallic twist, and finished off on the ground with silver metallic fringe.

8. Costuming Soldiers
We used the uniforms purchased from our previous float in D-Day Invasion Float in 2015. We added bags, canteens, and helmets by scavenging local flea markets, Army/Navy stores, personal contacts, and even renting from area prop stores. If you own the uniforms we would recommend dirtying them up to create a more authentic look.
Regarding firearms: Whenever possible, we try to locate authentic firearms. We have the firing pins removed and our local police inspect them to ensure that they are props. Air-soft replicas are often used or even replicas rented if needed.
Facial makeup adds a great touch. Padding is placed underneath the canvas where actors would be laying down to help them be able to stay comfortable in those positions.

9. Finished Product
We have used a pickup truck to pull our float the past few years. If you have people accompanying the float make sure they stay behind the float so as not to block the view of the float.
10. Dress Rehearsal
Always do a test with your full costumed actors to make sure everything works as you have envisioned. It gives you a chance to see what needs to be added/changed and to make sure you have all props ready.
Tell us how you'd improve on this float design in the comment section below. If you build a version of this float yourself, send us some photos! We'd love to see what you come up with.